
Download puzzle & solution
Share puzzle
Our puzzles are completely free. Please support this website by recommending it to your friends and family. Thank you!
New puzzle
Picture Maze
Picture Maze combines a classic labyrinth with a picture puzzle. There is exactly one entrance and one exit on the grid. Those who find the correct way through the open corridors and color in all touched squares reveal a hidden pixel graphic.
The puzzle type is also known under the name Maze-a-Pix. Other established terms include Maze Paint, Meiro Puzzle, and Meikyu Kaiga. This tutorial covers the basic black-and-white form: coloring the path itself, not the dead ends. Variants with colors or reversed coloring have additional rules and are not mixed here.
The following instructional example is intentionally only 12×12 squares in size. It was constructed based on the same principle as the larger game puzzles: all cells are connected through a perfect maze. Therefore, there is exactly one simple path between the entrance and the exit. Coloring this path creates an airplane.
Basic Rules
- The maze has an opening as entrance and a second opening as exit.
- Movement is only horizontally or vertically from cell to cell. Diagonal steps are not allowed.
- A drawn wall must never be crossed. A missing wall between two adjacent cells indicates an open passage.
- A connected path from the entrance to the exit is sought.
- Every cell on this path is colored in. The collective colored cells form the hidden picture.
- In the perfect mazes used here, the path is unique. A dead end or a side branch cannot be part of the solution path.
- A cross serves as an auxiliary mark for a cell in an excluded wrong way. It is not part of the finished picture.
Two Solution Paths in a Figurative Sense
You can start at the entrance and follow the corridor. At each bifurcation, you must decide which branch to continue. For small puzzles, this is possible, but uncontrolled trial and error easily leads to a long false route.
A more systematic approach is removing dead ends: start at a closed end and trace back the wrong way until a real bifurcation is reached. Repeating this at all ends leaves only the cells of the entrance-exit path. This method is illustrated in the next steps.
1. Find the entrance and exit
First, find the two interruptions on the outer frame. In the example, the entrance is at the top at row 1, column 5; the exit is at the bottom at row 12, column 5. The two marked outer edge cells are the ends of the sought path.
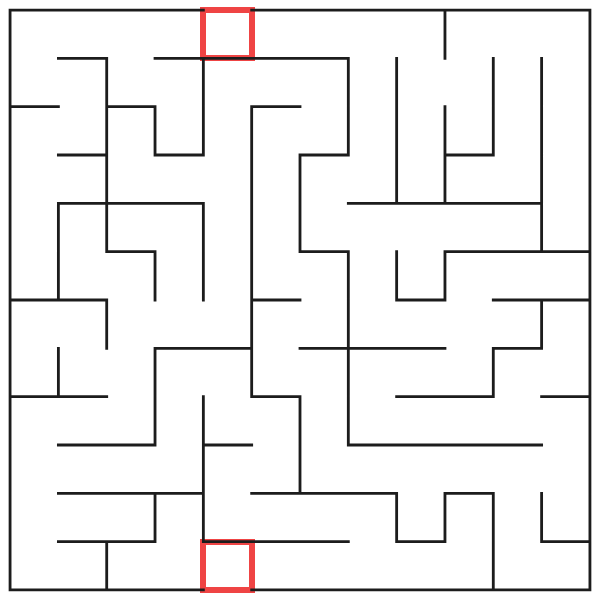
An edge gap is not a regular side branch: entrance and exit must never be removed when later crossing out dead ends. All other corridor ends inside are candidates for wrong ways.
A helpful first check is the frame. If there are more than two openings or a supposed opening only appears in a faintly drawn wall, the grid was misread.
2. Exclude a single dead end
Consider row 7, column 11. This cell is surrounded above, right, and below by walls. Its only passage leads to the left at row 7, column 10.
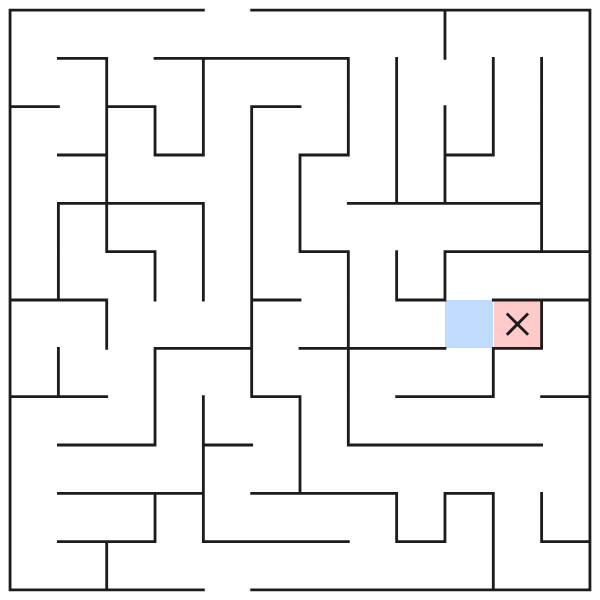
The marked cell is neither entrance nor exit. If the solution path led into it, it would have to return through the same passage. Doing so would mean using a cell or an edge twice, instead of continuing as a simple path to the exit. Therefore, this cell is definitely not part of the solution and receives a cross.
This smallest form of dead end is especially valuable: it doesn’t require knowing where the rest of the solution path runs. The three visible walls and the two known edge openings are sufficient.
3. Trace out a non-bifurcated wrong way up to a junction
In row 6, a longer side branch ends on the right. Row 6, column 12 is its closed end. From there, the corridor only leads left to row 7, column 10.
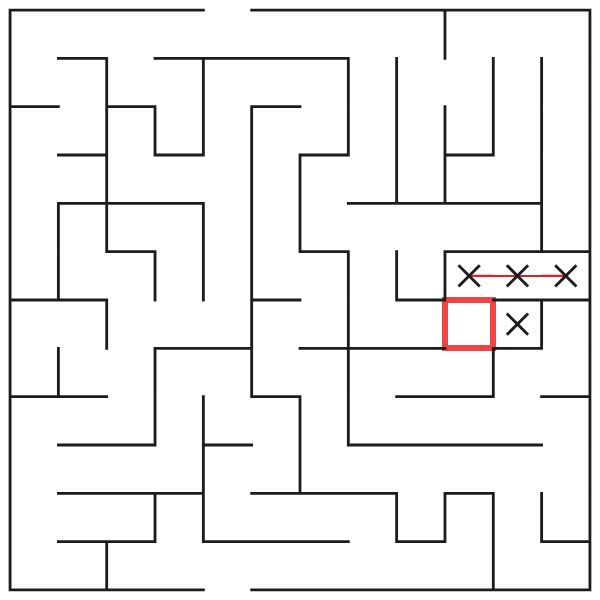
Start at the closed end and cross out the three cells backward. In the first two cells, there is only one continuation after going back, so none of them can be part of the entrance-exit path. Only at the connection cell in row 7, column 10 do additional open directions exist; this is where elimination stops.
The boundary is important: the connection cell itself is not automatically crossed out. A dead-end rule only eliminates the branch up to the first point where another continuation remains open.
4. Remove a branched wrong path from outside inward
To the right of row 5, column 8 lies a small branched sub-tree. One end is in row 5, column 11, the other in row 6, column 9. Both branches meet in row 5, column 9 and are connected to the rest of the maze.
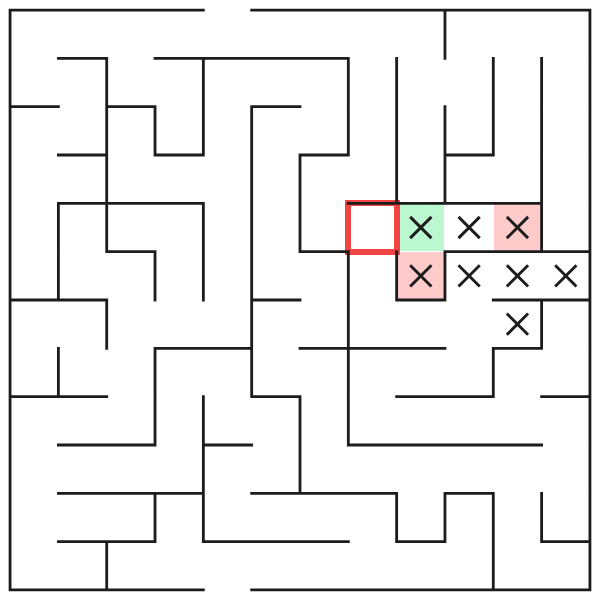
First, remove the two end branches. Then, their common cell no longer has a continuation and becomes a dead end itself. This inward elimination continues until reaching the connection cell in row 5, column 8.
This is more than a long blind pipe: a whole branched area can be a wrong path. You remove its leaves first and then work back through newly freed ends to the stem.
5. Recognize newly formed dead ends in rounds
With larger outer sections, proceeding in rounds is clearer. The image already shows three outer layers of dead ends crossed out. As a result, row 2, column 11, row 2, column 12, row 3, column 1, and row 8, column 2 become new ends.
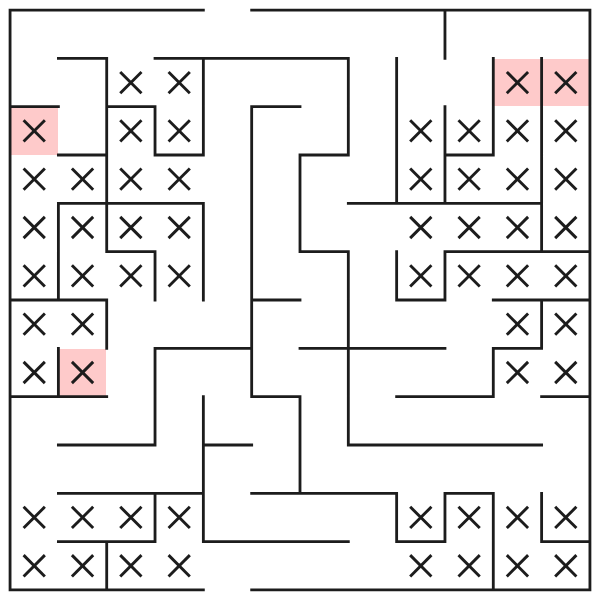
The highlighted cells were not immediate dead ends in the original maze. Only after removing the underlying wrong ways did they develop into dead ends in the still active corridor network, as shown in the fourth step.
This repeated peeling is a logical chain reaction. After each round, a new overview over the entire grid is worthwhile because a cross at one point often prepares further safe eliminations elsewhere.
6. Remove all false branches in parallel
Apply the same rule to all internal ends. No cross is advised: each marked cell became a dead end in one of the successive rounds, while the two edge cells at the entrance and exit are explicitly protected.
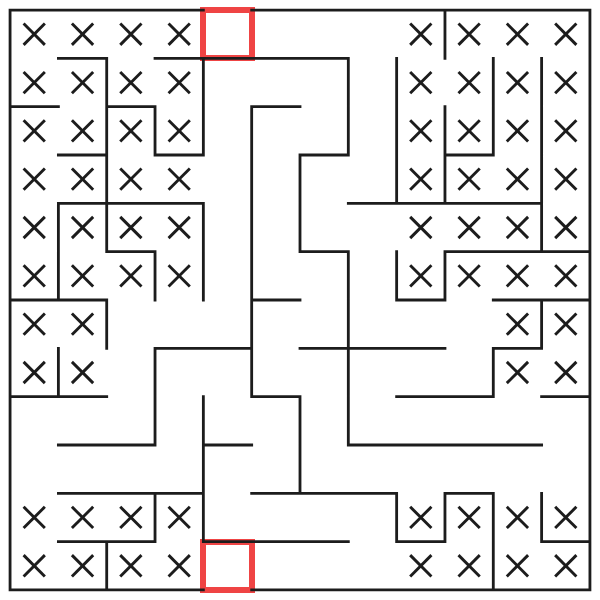
After eleven rounds, all 72 cells outside the solution path are excluded. The 72 un-crossed cells form a single connected chain from the top to the bottom edge. Since the maze has a tree structure, there can be no second route or closed loop between the protected ends.
This completes the actual path decision. What follows is no longer guesswork, but controlled coloring of the only remaining corridor.
7. Color the remaining path from the entrance
Start in the entrance cell at row 1, column 5 and color only through open wall gaps. Since all false side branches are already crossed out, there is at most one un-crossed continuation at each bifurcation. The first section extends in the image up to and including row 9, column 8.
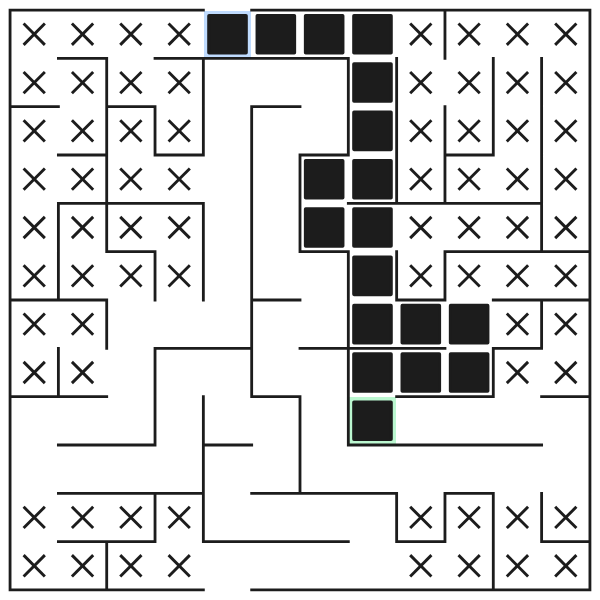
Check two things at each step: there must be a wall gap between the current and the next cell, and the next cell must not carry a cross. This way, the colored section can neither lead into an excluded branch nor jump a wall.
A longer stretch can be executed as a continuous brush stroke if the corridor is unambiguous. In tight curves, it’s still wise to stop briefly and check the next opening.
8. Work backwards from the exit
You don’t have to work only from top to bottom. In the intermediate state, the path from the entrance is colored up to row 9, column 7 and simultaneously from the exit backwards to row 7, column 4. Only the un-crossed middle section remains between both fronts.
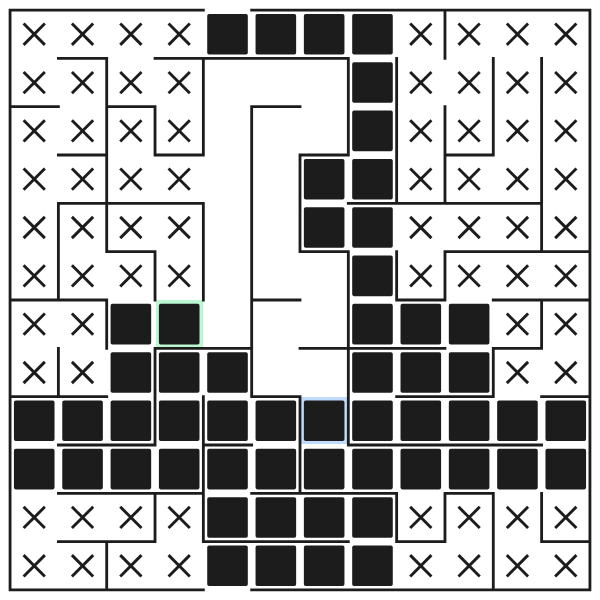
Working from both ends is a useful check. Each front follows the same single remaining corridor; they can’t go wrong or end in different valid routes. If a front hits a cross or a wall, there is an input error.
Proceed both sections until they meet. The contact cell is painted only once. This creates a continuous, unbranched connection between the two edge openings.
9. Check the completed picture with the full path
Finally, hide all auxiliary crosses. Only the painted cells of the entrance-exit path remain visible. In the sample, the path consists of exactly 72 cells.
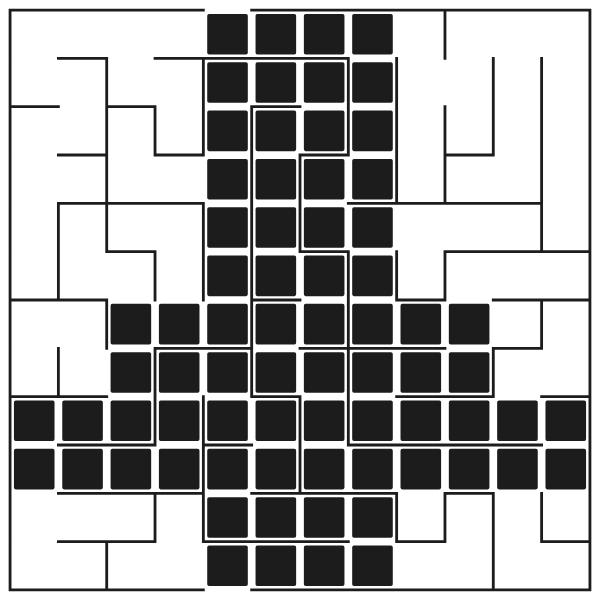
The finished silhouette depicts an airplane from above. At the same time, the coloring satisfies the maze condition: each black cell is on the only route, neighboring path cells are connected through open passages, and the chain extends uninterrupted from entrance to exit.
Image recognition is an additional plausibility check, but not a substitute for the path logic. A seemingly nicer pixel at a spot would be wrong if it required crossing a wall or coloring a dead-end cell.
Proven Workflow
- Mark entrance and exit and treat them as protected ends.
- Look first for internal cells with only one open passage.
- Eliminate each non-bifurcated wrong path up to the next real junction.
- Remove branched side sections from their outer ends inward.
- After each elimination round, look for newly created dead ends.
- Repeat until only one chain remains between the edge openings.
- Color this chain from the entrance, from the exit, or from both sides.
- At the end, check both the continuous path and the resulting image.
Common Mistakes
- Cropping the edge openings: Entrance and exit also look like corridor ends locally but are the two sought path ends.
- Eliminating too far into a bifurcation: A wrong way logically ends at the connection to the still active rest. The connection cell remains initially open.
- Overlooking a thin wall: What matters is not whether two cells look close but whether there’s actually a gap between them.
- Diagonal shortcuts: Even two black cells touching only at a corner are not connected.
- Guessing the motif: The image appears as a result of the path. Drawing ahead based on a guessed silhouette can create rule-violating cells.
- Confusing auxiliary crosses with image cells: Crosses mark excluded cells; only painted path cells belong to the solution.
Tips for Beginners
- Work with short, secure sections and check the walls after each.
- Start with obvious single-cell dead ends; they often trigger longer chains.
- Switch regularly between the top, bottom, left, and right grid areas instead of fixating on a complicated spot.
- If a large bifurcation is confusing, mark only its outermost ends first and revisit later.
- Use both the entrance and exit actively. Two working fronts shorten the final check.
- Check the picture only at the end as a whole. The labyrinth rules remain the reliable basis at every step.
Conclusion
Picture Maze can be reliably solved once you systematically remove false branches instead of guessing at each bifurcation. The simple rule "An internal dead end cannot lie on the entrance-exit path" leads, through repetition, to a complete solving procedure.
When only the unique remaining corridor is left, coloring it turns the path into a pixel picture. This connection of clean maze logic with visible reward is what makes Picture Maze or Maze-a-Pix special.